July 22, 2013

Rock climbing wall for American Girl Doll

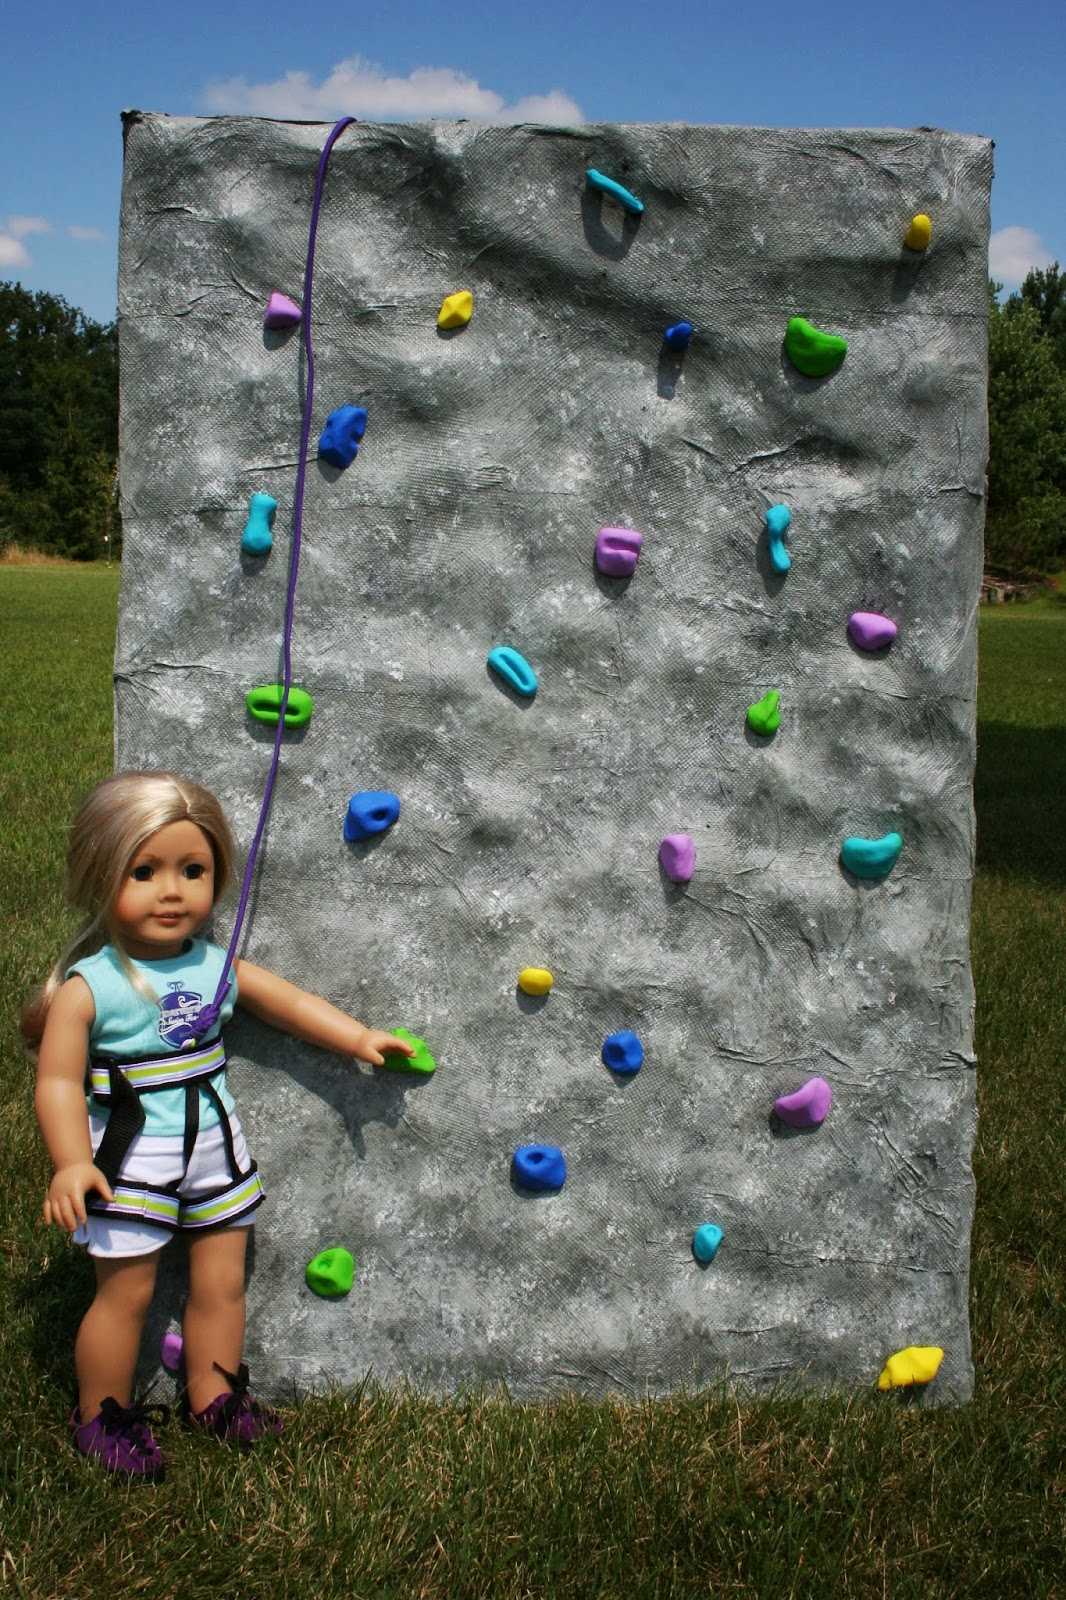
Overall dimensions: size 2' x 3'
 
See my other free Rock Climbing tutorials


What you need

  • 1/4" sheet of plywood or similar (2' x 3')
  • 1/4" sheet of insulating foam (optional)
  • roll of paper towel (I use the one with the smaller pieces)
  • 1 pint of Elmer's glue
  • water
  • acrylic paints in the color of your rock (for granite I used grey, white and black)
  • matte acrylic sealer
  • primer (I used a spray can of primer)
  • 5 colors of FIMO or Sculpey
  • hot glue gun

This project takes a few days because of drying times in between !

How to make the rock climbing wall

1.  Mix 2 cups of Elmer's glue with 1 cup water (or whatever quantity you want)

2. Tear off a whole bunch of paper towels

3. If you want you can cut shapes from foam to create overhangs and other big forms.
    Glue to board.

4. Dip a paper towel in glue mixture and make thoroughly wet then form a ball and wring out.
    Put ball on board.

5. Repeat putting ball shaped paper towels on board until you have the conture you want

6. Cover whole board with 2 layers of paper towels
    (I went in different direction on second layer, not shown in picture)

7. Let dry 24h (or until dry)

8. Put 2 more layers of paper towel on board and let dry again 24h

9. Put 2 more layers of paper towel on board and let dry again for a couple of days.
    You should now have 6 layers

10. After everything is completely dry (I let mine dry for a week) you can prime it.
    If you don't like the seams of the paper towel, you could hide them with drywall spackeling
    before you prime (let spackeling dry before priming)
    Make sure you don't use acrylic paints as primer, they will soften your glue again.
    Let dry.

11. Paint wall with acrylic paint in your base color, mine was a lighter grey.
      Let dry.

12. Take a sponge or crumpled up paper towel and paint spots in your other colors
      Make it look like rock, then let it dry.

13.  Seal with acrylic sealer.


How to make the grips

1. Take Sculpey or FIMO and form different shaped grips.
    For the bigger grips I used 1/4 pack for the smaller ones I used 1/8 of a pack.

2. Bake according to manufacturer's directions

3. Glue grips with hot glue gun to wall.

If you want, you can have the wall free standing by adding a triangular plywood piece on a hinge on the back.

You are done !!!


See my other free Rock Climbing tutorials

Climbing harness for American Girl Doll

See my other free Rock Climbing tutorials

What you need

  • 1" black webbing (nylon strapping, got mine at JoAnn )
  • 5/8" colored ribbon (smooth grain)
  • 3/8" black ribbon (gross grain)
  • 1" triglide buckle


How to make the Harness

1. Cut the following  from the 1" black webbing
       1x   18"  (for waist)
       2x     9"  (for legs)

2. Cut the following from the 5/8" colored ribbon
      1x    17 1/2"   (for waist)
      2x      9 1/4"   (for legs)

3. Cut the following from the 3/8" black ribbon
      1x      8"   (front leg support)
      1x    10"   (back leg support)

4. Top-stitch colored ribbon onto 1" black webbing.
    Folding over 1/4" on one end around webbing on legs.
    Center on waist strap, leaving 1/4" on either side.
    I used black thread in bobbin (bottom) and purple on top

5. Form leg loops, overlapping 1/2" and sew together.
    Top is where colored ribbon went over webbing.

6. Sew buckle to waist strap.


7. Put waist strap on doll (which is dressed in which she will climb)
    and position buckle where you want it (can't be in center)

8. Take back leg support (step 3) and fold in half  and pin onto center back on waist strap
    (on the inside)

9. Take one leg loop and put on doll and pin leg support on back of leg loop (on inside again)
    Make sure leg loop seam points outward of doll.
    Repeat for other leg loop.

10. Take front leg support (step 3) and fold in half  and pin onto center front on waist strap
    (on the inside)


11. Pin leg support on front of leg loop (on inside again)

      Repeat for other leg loop.

12. Take harness off carefully and sew all pieces in place
 

13. Take a 2" piece of colored ribbon and fold in half lengthwise and top-stitch.

14. Attach to center front waist strap (above front leg support) as climbing rope loop.

15. Take a 2" piece of back ribbon and fold in half lengthwise and top-stitch.

16. Attach to back waist strap on left or right (loop for chalk bag)


You are done !!!


See my other free Rock Climbing tutorials

Rock Climbing for American Girl Doll - over view


Rope is a parachute 550 cord, which I found at JoAnn Fabrics

July 20, 2013

Mask for American Girl Doll

See my other beach item tutorials


What you need

  • 1/8" plexiglass (acrylic glass) sheet (got mine at Home Depot)
  • clear plastic binder or poly binder or flexible cutting board or similar
  • colored plastic binder or poly binder or flexible cutting board (e.g same as fins)
  • 1/4" elastic or clear elastic strap
  • hot glue gun
  • coping saw (to cut plexiglass with)
  • Sculpey or FIMO
  • vegetable oil

How to make the mask

 1. Download free pattern here
     Remember to set page scaling to none.
     For home use only !!!!!

2. Cut out lens pattern from plexiglass

3. Cut out side pattern from poly binder

4. Lay lens on silicone mat and glue side to lens with hot glue
    Leave lens on mat that way you will have a nice straight finish in front

5. Draw outline of mask onto colored cutting board or binder and make a rim, then cut.


6. Take FIMO or Sculpey and form a nose part, bake according to manufacturer directions.


7. After Sculpey has cooled, cover with vegetable oil, then cover with hot glue.
    On a silicone mat would be best for this.
    Let hot glue cool, then remove Sculpey nose.
    Cut hot glue nose to fit mask and glue with hot glue to mask.


8. Glue rim to mask lens.

9. Cut slits in side of mask and attach elastic string.


You are done !!!


Return to see my other beach item  tutorials

Snorkel for American Girl Doll

See my other free Beach item tutorials


What you need

  • plastic clothes hanger
  • snips or handsaw to cut the plastic hanger 
  • Glue or hot glue gun
  • paint for plastic (optional)
  • scrap piece of foam sheet (for mouth piece)
  • electrical or duck tape (optional)
  • drill (optional)

How to make the snorkel

1. Paint this section of the hanger and let dry
    (I paint it while it is still a hanger, that way I can  hang it up while it dries)

2. Cut about 6" on straight part and past the bend.

3. Optional you could drill in on the straight end for 1/2" or so. This will make it look like a tube.
   (use a drill bit smaller than the hanger diameter)

4. Take the foam and cut an oval about 3/4" x 1/2"

5. Cut 2 little squares from foam to form the "bite" of the mouth piece and glue on oval

6. Glue oval to curved part of the hanger

7. Take electrical tape and wrap once around 1/4" down from straight end.
    This is the part that is normally seen above water.

8. You can use a rubber band to attach to mask


You are done !!!

See my other free Beach item tutorials

July 19, 2013

Harry Potter Accessories for American Girl Doll


 See my other free Harry Potter tutorials


Here are a couple of things I found to complete your Harry Potter theme


I found Hedwig's cage as a tea light holder at Michaels or a similar one at Amazon
(search for Bird cage tea light on google)

You can make Hedwig from polymer clay (for the body) and feathers or get a white owl from
e.g. Snowy Owl from Schleich or Snowy Owl from Bullyland

A trunk at Hobby Lobby, the web site says you can only buy it as a set but I was able to buy the smallest one in the store separately.

The chocolate frog card you can find in my blog, the frog I made from polymer clay .

The marauder's map you can find on my blog as well.

July 12, 2013

Puzzles and games for American Girl Doll


Puzzles


Download free puzzle here


Download free puzzle here


Download free puzzle here


Download free puzzle here


Download free puzzle here


Games


 Download free game checkers and morris


July 03, 2013

Hospital IV and stand for American Girl doll


What you need

  • freezer zip lock bag (or other clear sturdy plastic)
  • clear elastic jewelery thread or thick fishing line (about 1.3mm)
  • hot glue gun
  • Acrylic Water (got mine at Walmart)
  • Elmer's glue (optional)
  • 4 Jumbo craft sticks
  • 5/8" wooden dowel (18" long)
  • 2 small nails
  • small eyelet (optional)
  • metallic colored paint (optional)

How to make the IV bag

1. Take a piece of paper and draw the outline of your IV bag.
    Mine was 3 1/4" high and 2" wide as you can see below

2. Cut open your Ziplock bag along one seams and lay one side over your drawing.

3. Lay piece of jewelery thread or fishing line onto the Ziplock bag at the bottom,
   where the IV line will come out (mine has blue sparkles so you can see it better)

4. Put a bead of hot glue on the outline of the IV bag.
    Make sure you leave the top open !!!


5. Take the other Ziplock bag piece and press it onto the glue.

6. After glue has cooled, fill IV bag with water to check for leaks. Fix any leaks.

7. Empty water and dry IV bag, then fill the IV bag 2/3 with acrylic water,
    hang it up, the way the bag will be hanging and let acrylic water set (24 - 48h)

8. After acrylic water has cured glue the top seam together

9. Create a little hole in the top and strengthen with eyelet (optional)

10. If you want you can put a small glop of hot glue about 1/3 down around the IV line.
      This can be the switch.


How to make the IV stand

1.  Take a craft sticks and cut in center, then remove half your width on both cut sides.
     Repeat for second craft stick.

2. Take whole craft stick and 2 halves and glue halves on either end,
    Repeat for the other one.

3. Take both finished sticks and glue them onto each other forming a cross.

4. Glue and nail dowel onto center of cross.

5. Bend nail in the middle at 90 and nail into top of dowel. This is where the IV bag will be hanged.

6. Paint silver if you want


You are done !!!


See my other hospital item tutorials for American Girl dolls