December 09, 2014

Trip to Paris - overview for American Girl Doll


Other travel items like backpack, neck pillow, ...  can be found here

Paris Trip - Travel Guide for American Girl Doll

Other free Paris items can be found here
Other free travel items can be found here

What you need

  • Paper and printer
  • glue
  • clear self-adhesive laminate or tape (optional)
  • book binders or paper clips (optional)
  • parchment paper or anything non-stick


How to make the Guide

1. Download Travel guide here, copyrighted and created by me, ReadCreations.
    For private use only !!!
    Some of the item images, I found on google some are my own from a recent trip to Paris.
    If I am infringing on anybodies copyright, let me know right away, that is not my intention.

2. Cut out each page and fold in half, with the picturues and writing facing inwards.

3. Stack all guide pages (but not the cover), with the folded sides all on top of each other.
    Make sure they are all facing the same way.

4. Hold together with book binders

5. Put liberal amounts of glue on folded edges to bind them together. Let glue dry

6. Cut out cover and cover printed side with clear self-adhesive laminate or tape (optional)

7. Fold cover around page stack. It will be folded in 2 places to form the spine of the book.


8. Glue cover to first and last page of book.
    Put a piece of parchment paper in between the front page to protect the other pages from glue.
    Same for the last page.

9. Optional, you can glue all blank sides together.

You are done !!!

Paris Trip - Maps and Tickets for American Girl Doll

Other free Paris items can be found here
Other free travel items can be found here

What you need

  • Printer and paper

How to make the Maps and tickets

1. Download Maps and tickets here, created and copyrighted by me, ReadCreations.
    For private use only !!!
    Some of the item images, I found on google some are my own from a recent trip to Paris.
    If I am infringing on anybodies copyright, please let me know right away. That is not my intention.

2. Cut out the 'Map of Paris' and fold accordion style.

3. Repeat the same for the 'Metro' map.

4. Cut out the Boarding pass and add your dolls name to it (I have more of them in my travel section)

5. Cut out the Metro Day Pass (black ticket)

6. Cut out the Metro One-Way tickets (3 white tickets)

Paris Trip - Money for American Girl Doll

Other free Paris items can be found here
Other free travel items can be found here

What you need

  • Printer
  • Scissors
  • Glue


How to make the money

1. Download Doll sized money here.
    For private use only !!!

2. Cut out bills, have front and back in one piece

3. Fold in half and glue.

September 12, 2014

Medieval Cape for American Girl Doll


What you need

  • 1 yrd of light linen or light costume fabric
  • either 1 set of Hook and Eye Size 3  or 
  • about 20" of 3/8" ribbon

My Medieval Dress pattern is available for purchase in my store or at PixieFair.

How to make the cape

1. Download my free pattern here

    This pattern is copyrighted by Read Creations and is for private use only.
    Make sure you have page scaling set to none !

1.  Take fabric and fold in half, then fold in half the other way

2. Draw a circle with a radius = 1 3/4" around the corner that is on fold in both directions
    as the neck opening.

3. Draw a second circle with a radius = 15 1/2" around the same corner.

4. Open fabric circle that was just cut and cut and remove 1/4 of it.

5. Take hood and fold right sides together.
    Sew around back side of hood with a 1/4" seam.

6. Fold open and align neck line of hood with neck line of cape, right sides together.
    Pin in place and sew with 1/4" seam.

7. Either hem with a 1/4" seam or a double hem (folded 1/8" then folded again 1/8" or a little more)
    all around the front of the cape and the front of the hood in one hem.

8. Either hem with a 1/4" seam or a double hem(folded 1/8" then folded again 1/8" or a little more)
    all around the bottom of the cape.

9. Either add a hook and eye clasp or a ribbon on either side of the neck opening on the cape,
   around 3/4" down from the neck seam.


You are done !!!

May 26, 2014

Hammock for American Girl Doll

See my tutorial for the hammock stand

What you need

  • 11" x 25"  fabric
  • 2x wooden dowels 5/16" or similar (11" long)
  • 2x string about 18" length

How to make the hammock

1. Double hem a 1/4" along both long sides

2. On short side fold in 1/4" then fold 1", sew


3. Notch around both ends on dowel, to prevent string from slipping

4. Tie string around ends and make a loop in center


You are done !!!


See my tutorial for the hammock stand.


Hammock Stand for American Girl Doll

See my tutorial for the hammock

What you need

  • 4' of 1/2" PVC pipe
  • 2x cross 1/2" PVC
  • 2x 45degree 1/2" PVC
  • 6x end cap 1/2" PVC
  • 2 small hooks or eyelets
  • PVC primer and cement

How to make the hammock stand

Legs and sides are removable for easy storage

1. Cut PVC into the following lengths
       1x  8"    (part A)
       2x  10"  (parts B)
       4x  3"    (parts C)
       2x  1"    (parts D)

2. Take part A and add both crosses on either end, glue in place.

3. Take parts D and add to cross to extend part A, glue in place.
 

4. Take parts C and add to cross on either side, don't glue.
 

5. Take 45 degree PVC connector and add to parts D, pointing up, glue in place.

6. Take end caps and add to parts C, glue in place.
 

7. Take parts B and add an end cap on one end, glue in place.
 

8. Add eyelet/hook to end cap

9. Add part B to 45 degree PVC connector

10. Paint if you want

You are done !!!

See my tutorial for the hammock

May 21, 2014

Music - overview for American Girl Doll

Recital Dress
Recital Dress
Music Books
Music Books
Music stand
Music Stand

Music Stand for American Girl Doll

See my other Music tutorials


What you need

  • 4 craft sticks (4 1/2" x 3/8")
  • 1/4" wooden dowel (10 1/2" long)
  • chipboard or sturdy cereal box
  • black and/or silver acrylic paint (depending on what colors you want)
    I used black and silver
  • Acrylic sealer
  • Elmer's glue
  • hot glue gun
  • 2 small nails (optional, but recommended)

How to make the music stand


1. Cut 2 pieces of chipboard 3 1/2" x 5 1/2" and glue together, let glue dry.

2. Cut 2 pieces of chipboard 5/8" x 5 1/2" and glue together, let glue dry.

3. Glue piece from step 2 at a 90 angle to piece from step 1 along the long side
    Sorry I forgot to take pictures on the first few steps
    Here is it already painted

4. Round corners if you want

5. Paint black, let dry. Then seal with acrylic sealer.

6. Take 2 of the craft sticks and mark the center

7. Take a craft sticks and cut in center, then remove half your width on both cut sides.
     Repeat for second craft stick.
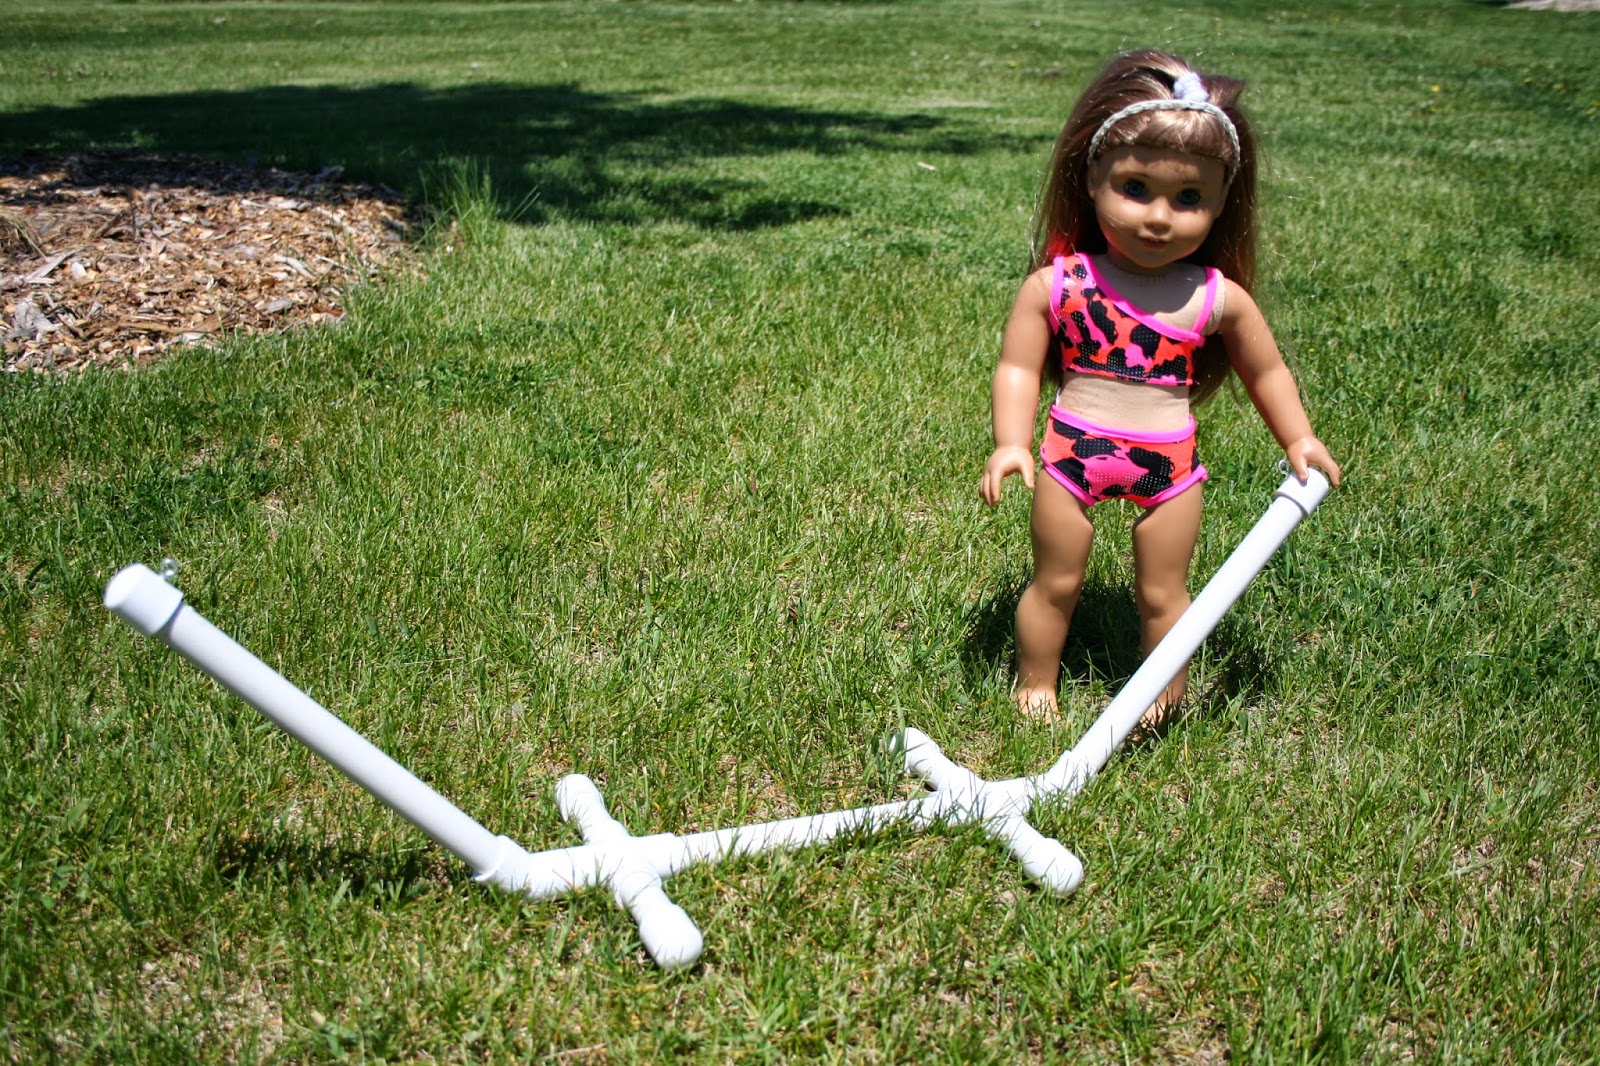
     The following pictures are from my IV stand tutorial but the principle is the same,
     Just that the craft sticks for the music stand are a little smaller.


8. Take whole craft stick and 2 halves and glue halves on either end,
    Repeat for the other one.

9. Take both finished sticks and glue them onto each other forming a cross.

10.  Paint the finished cross black and seal with acrylic sealer

11. Cut the dowel at an angle on one end, this is the angle the music stand top will have,
     where the sheet music rests.
     You can also cut the dowel shorter if you want the stand to be lower, e.g. sitting.

12. Paint dowel silver and seal with acrylic sealer

13. Glue and nail dowel onto center of cross.


11. With hot glue gun glue center of music stand top to dowel, 
      Additionally attach top to dowel with small nail if possible for extra strength

You are done !!!